
# Simple Integration Walkthrough
# Introduction
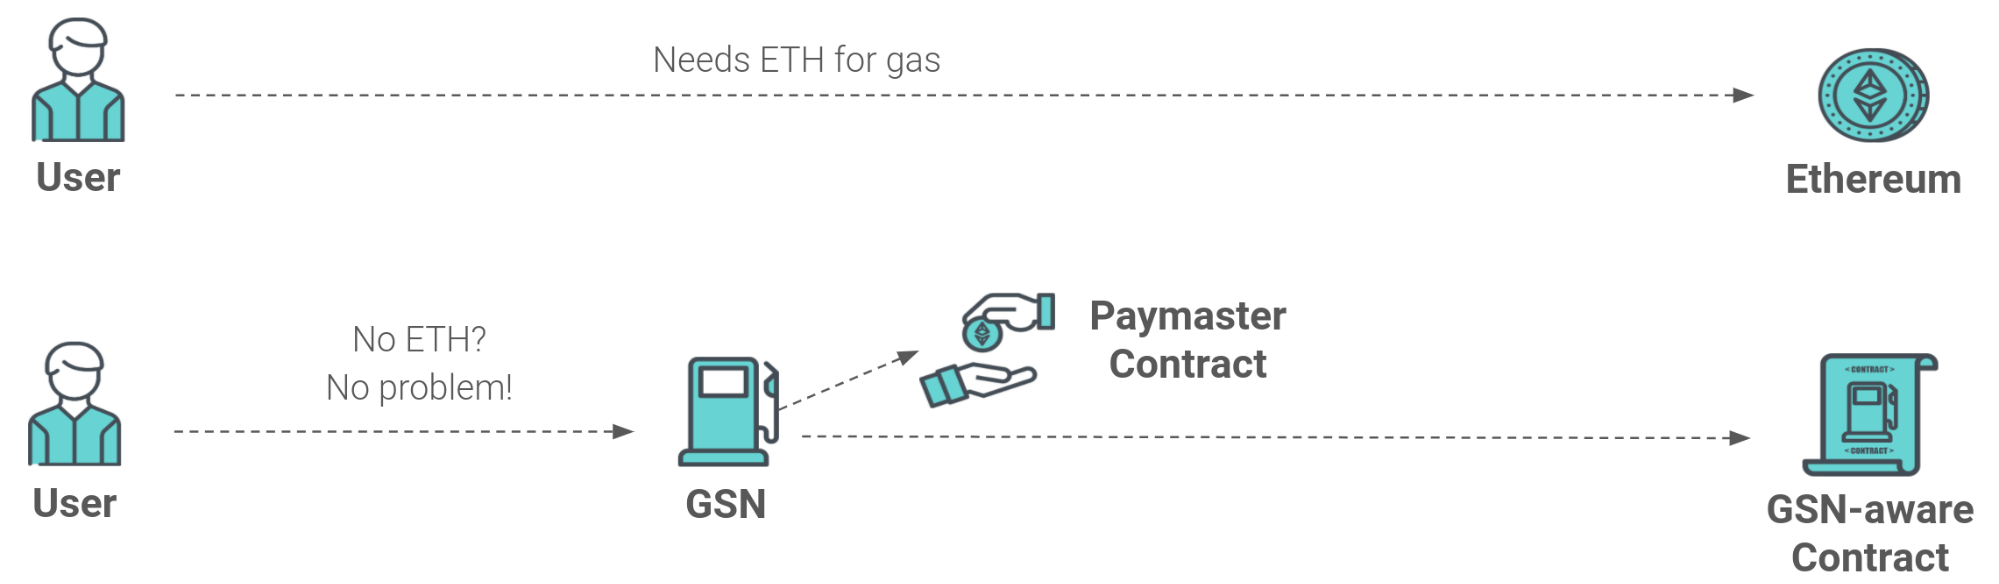
Ethereum transactions cost gas, which means your dapp’s users cannot initiate them unless they already have some ether. Onboarding new users into Ethereum is problematic.
GSN provides a solution by allowing a different entity, either you or a third party, to pay for transactions.
In this article you learn how to accept transactions that are paid for by somebody other than the sender, how to sponsor transactions, and how to write a user interface that uses GSN.
# Converting a Contract to Support GSN
To accept transactions that are paid for by a separate entity you have to do several things:
Add
@opengsnpackages to your project's dependenciesnpm install @opengsn/contracts --saveImport the base contract, and inherit from it:
import "@opengsn/contracts/src/ERC2771Recipient.sol";
contract MyContract is ERC2771Recipient { ... }
Create a constructor that calls
_setTrustedForwarder()with the address of a trusted forwarder.
The forwarder is the GSN component that verifies the caller's signature and nonce, before forwarding it to your contract, and it is the only component that your contact has to "trust".
You can look here to see the addresses to use on mainnet and various test networks.Replace
msg.senderin your code, with_msgSender(). If you receive a normal Ethereum transaction (from another contract or external account that pays for its own gas), this value is identical tomsg.sender. If you receive a meta-transaction through GSN,_msgSender()gives you the correct sender whereasmsg.senderwould be the above forwarder.Note that if you use OpenZeppelin contracts, they already use
_msgSender()for this purpose.
# Example: CaptureTheFlag
As a demonstration, here is an extremely simple capture the flag game (opens new window) that, when called, captures the flag and emits an event with the old and new holders.
import "@opengsn/contracts/src/ERC2771Recipient.sol";

contract CaptureTheFlag is ERC2771Recipient {
   event FlagCaptured(address previousHolder, address currentHolder);

   address public currentHolder = address(0);

   constructor(address _forwarder) {
     _setTrustedForwarder(_forwarder);
   }

   function captureFlag() external {
      address previous = flagHolder;

      // The real sender. If you are using GSN, this
      // is not the same as msg.sender.
      flagHolder = _msgSender();

      emit FlagCaptured(previous, flagHolder);
   }
}
# How does it Work?
Obviously, blockchain access is still not free. You get these GSN transactions with the help of two entities. The user's application talks with a RelayHub contract, which orchestrate the transaction. Through it, the applications find a relay server, or relayer, one of a number of servers that offer to send messages into the chain. The relayer then creates a wrapper transaction, and sends it to the RelayHub. This transaction first talks to a paymaster, a contract that decides which transactions to finance based on the sender, the target contract, and possibly additional information.
Paymasters are contracts, so they are always available, same as any other Ethereum contract. Relays are servers which get paid by paymasters for their services. Running a new relayer does not require any special skills (see directions here).
Note that everything the relays do is verified. They cannot cheat, and if a relay attempts to censor a client at most it can delay the message by a few seconds before the client selects to go through a different relay.
# Creating a Paymaster
Somebody needs to pay for your users’ transactions on the blockchain. In the future it might be a commercially available service, but for now the entity most likely to pay for your users’ transactions is you, the dapp owner. In this section you learn how to create a paymaster to accomplish this.
For the purpose of this tutorial, We are going to present a simple paymaster that accepts all requests to a specific contract, and nothing else. This can be an on-boarding contract, which calls other contracts.
You can see the complete code here (opens new window). Look below for a line by line explanation.
pragma solidity ^0.8.7;
// SPDX-License-Identifier: MIT

import "@opengsn/contracts/src/BasePaymaster.sol";
All paymasters inherit from BasePaymaster. That contract handles getting deposits,
ensuring functions are only called by the relay hub, and so on.
Note
This paymaster is naive because it is not a secure implementation. It can be blocked by sending enough requests to drain the account. For more sophisticated paymasters see the paymasters package (opens new window)
contract NaivePaymaster is BasePaymaster {
This variable holds the one target contract we are willing to pay for.
address public ourTarget;
When the owner sets a new target, we want to emit an event to inform the world about it.
event TargetSet(address target);
This function sets the address of the recipient contract we are willing to pay gas for.
    function setTarget(address target) external onlyOwner {
        ourTarget = target;
        emit TargetSet(target);
    }
The main logic should be placed in the _preRelayedCall method, where the decision whether to pay for a
transaction or not is made. The GNSType.RelayRequest type is defined
here (opens new window).
It includes multiple fields - we’ll use the .target, which is the target contract.
    function _preRelayedCall(
        GSNTypes.RelayRequest calldata relayRequest,
        bytes calldata signature,
The approval data is sent by the web client through the relay. It can include any data the
dapp needs to decide whether to approve a request or not.
Note that by default, BasePaymaster rejects a request with approvalData (or paymasterData)
If a paymaster wants to use them, it should override the validation _verifyApprovalData(). See for example VerifyingPaymaster (opens new window)
bytes calldata approvalData,
This parameter can be used, in conjunction with relayHub.calculateCharge(), to calculate
the cost a transaction would incur. Using it is beyond the scope of this basic tutorial.
uint256 maxPossibleGas
The context that the function returns is shared with the postRelayedCall method.
It is a way to share information about the call (for example, from the approval data) from the pre- to the post- method without an expensive state change.
The rejectOnRecipientRevert value that the function returns allows the Paymaster to delegate the decision to the recipient itself.
Using this feature is beyond the scope of this tutorial.
) external override returns (bytes memory context, bool rejectOnRecipientRevert) {
This paymaster is naive, but not a complete sucker. It only accepts requests going to our
recipient smart contract. This is the way that preRelayedCall returns a rejection - either by
failing a require, by explicitly calling revert, or even just running out of gas. If we return any value from this function
normally it means that the paymaster is committed to paying for the transaction, and
will do so even if the transaction ultimately fails.
require(relayRequest.request.to == ourTarget);
The return value is used to pass a "context" from the preRelayedCall (which receives the entire request)
to the postRelayeCall.
For a simple paymaster (like ours...) this is not required, but more complex paymaster might perform some
post-relay operation.
In this sample, we just return the sender's address and emit it in the postRelayedCall.
        return (abi.encode(relayRequest.request.from), false);
    }
This function is called after the relayed call. At this point the cost of the request
is almost known (with the exception of the gas cost of postRelayedCall itself), and we can
do any accounting we need, charge entities, etc.
    function postRelayedCall(
        bytes calldata context,
        bool success,
The gasUseWithoutPost parameter provides the gas used for the transaction so far. It includes
all the gas of the transaction, except for the unknown amount we are going to use in the
postRelayedCall itself.
	uint256 gasUseWithoutPost,
        GsnTypes.RelayData calldata relayData
    ) external relayHubOnly override {
        emit PostRelayed(abi.decode(context, (address)));
    }
This function returns the version of the GSN protocol the paymaster supports.
In this case, the version is the latest at writing, 3.0.0.
    function versionPaymaster() external virtual view
    override returns (string memory) {
        return "3.0.0";
    }
}
# Initializing the Paymaster
It is not enough to deploy the paymaster contract. Any paymaster contract needs to
attach to a RelayHub and Forwarder.
In the case of our NaivePaymaster you also need to specify the target
for which you are willing to pay. Additionally, the paymaster is not going to help
anybody unless you actually fund it to be able to pay.
You fund a paymaster by sending some ETH to it (though this ETH immediately deposited into the RelayHub)
You can also deposit ETH for the paymaster by calling RelayHub.depositFor(paymasterAddress)
The deployment script (scripts/deploy.js) initializes the paymaster when deployed on a local machine.
If you want to deploy it on a real network, you need to update the contract addresses.
You can find here the deployed addresses of GSN on different mainnets and testnets.
# The User Interface
Your contract is not going to do any good if users can’t use it. The way users interact with a contract using GSN is a bit different from the way they do it for a normal dapp, because they need to go through a relayer and don't need ether.
The tutorial below assumes you have a working application that uses Ethers (opens new window) and Hardhat (opens new window) Any framework can be (such as React (opens new window)). For our sample application we don't use a framework, only browseify (opens new window) to pack the packages,
Also, our sample app works directly with Metamask using windows.ethereum
- First add GSN to your project:
yarn add @opengsn/provider @opengsn/contracts
Also you will need the following dev dependencies to run your project locally:
yarn add --dev @opengsn/dev @opengsn/cli
- When you test your project locally, you usually start a local node using
hardhat node. In order to start a Hardhat node run:
npx hardhat node
_Important note on using hardhat-deploy plugin with the GSN. The GSN requires the Hardhat to be running in a
standalone process, this triggers the hardhat-deploy and the deployment script usually requires the GSN contracts.
This creates a "chicken and egg" situation. In such case you can run:
npx hardhat node --network hardhat --no-deploy
In order to deploy GSN contracts and start a Relay Server run:
npx gsn startThis command will install GSN contracts and start a local Relay Server. It also deploys an "accept-everything" paymaster that can be used to pay for all transactions.
Note that the
npx gsn startcommand writes the deployment artifacts to thebuilddirectory.Deploy your contracts same as you did previously. You can access the GSN artifacts generated by
gsn startin thebuilddirectory.Now in the source code, we need to locate the access to
windows.ethereum, and wrap it with a wrapper provider that will redirect transactions through GSNTo add GSN support, you wrap it with a GSN "RelayProvider" like this: Make sure to include that directory in your application build process.
const paymasterAddress = require('../build/gsn/Paymaster.json').address
web3Provider = windows.ethereum
web3provider = await RelayProvider.newProvider({
  provider: web3provider,
  config: {
    paymasterAddress,
  }
}).init()
The provider can be used normally: all view calls are passed directly to the wrapped provider. Transactions on contracts are redirected through GSN
That's all the change we need to make our application go through GSN. Now when the user attempts to make a transaction, he will be asked to sign the request, but not pay for it.
# Running Tests
You can also use GSN inside your test scripts, to see how your contract works when executed through GSN.
- By default,
hardhat testuses an in-memory provider. Unfortunately, GSN's relay service is an external process, and can't access this provider. - Instead, you need to run your test using a "development" network, running on an external node
- To simplify this, you can run your test using
run-with-hardhat-node "hardhat test --network dev" - This command-line starts
hardhat node, then launches the test command line, and when the test finishes, it also shuts down the node. - Inside the test, we start GSN using
GsnTestEnvironment.startGsn() - This way, you can test both GSN and non-GSN execution of the contract.